Disclosure: This post may contain affiliate links, which means I may earn a commission if you decide to make a purchase through my links, at no cost to you. Thank you for your support!
Hiking Half Dome is one of Yosemite National Park’s most thrilling and wild adventures. With a 45-degree slippery granite face and a deadly reputation, it’s hard to believe the National Parks Service allows everyday hikers to climb Half Dome.
The hike up Half Dome isn’t to be taken lightly. The challenging hike requires thorough planning, physical preparation, and a deep respect for nature. It is known as one of the most dangerous hikes in the United States because people have died from slipping off the rock, lightning strikes, dehydration, and heart attacks.
The desire to stand atop the colossal rock formation and take in the sweeping 360-degree views is a bucket list adventure I recently crossed off my list. There is nothing like the sense of accomplishment knowing you climbed one of the most challenging hikes in the National Park system.
In this guide, you’ll learn everything from obtaining permits to navigating the steep trails, climbing the legendary cables, how to prepare to climb Half Dome, tips and tricks for the intense hike, and things I wish I had known before I started my Half Dome adventure. So, lace up your hiking boots and get ready to explore the iconic beauty of Half Dome in California’s Yosemite National Park.
What is Half Dome?
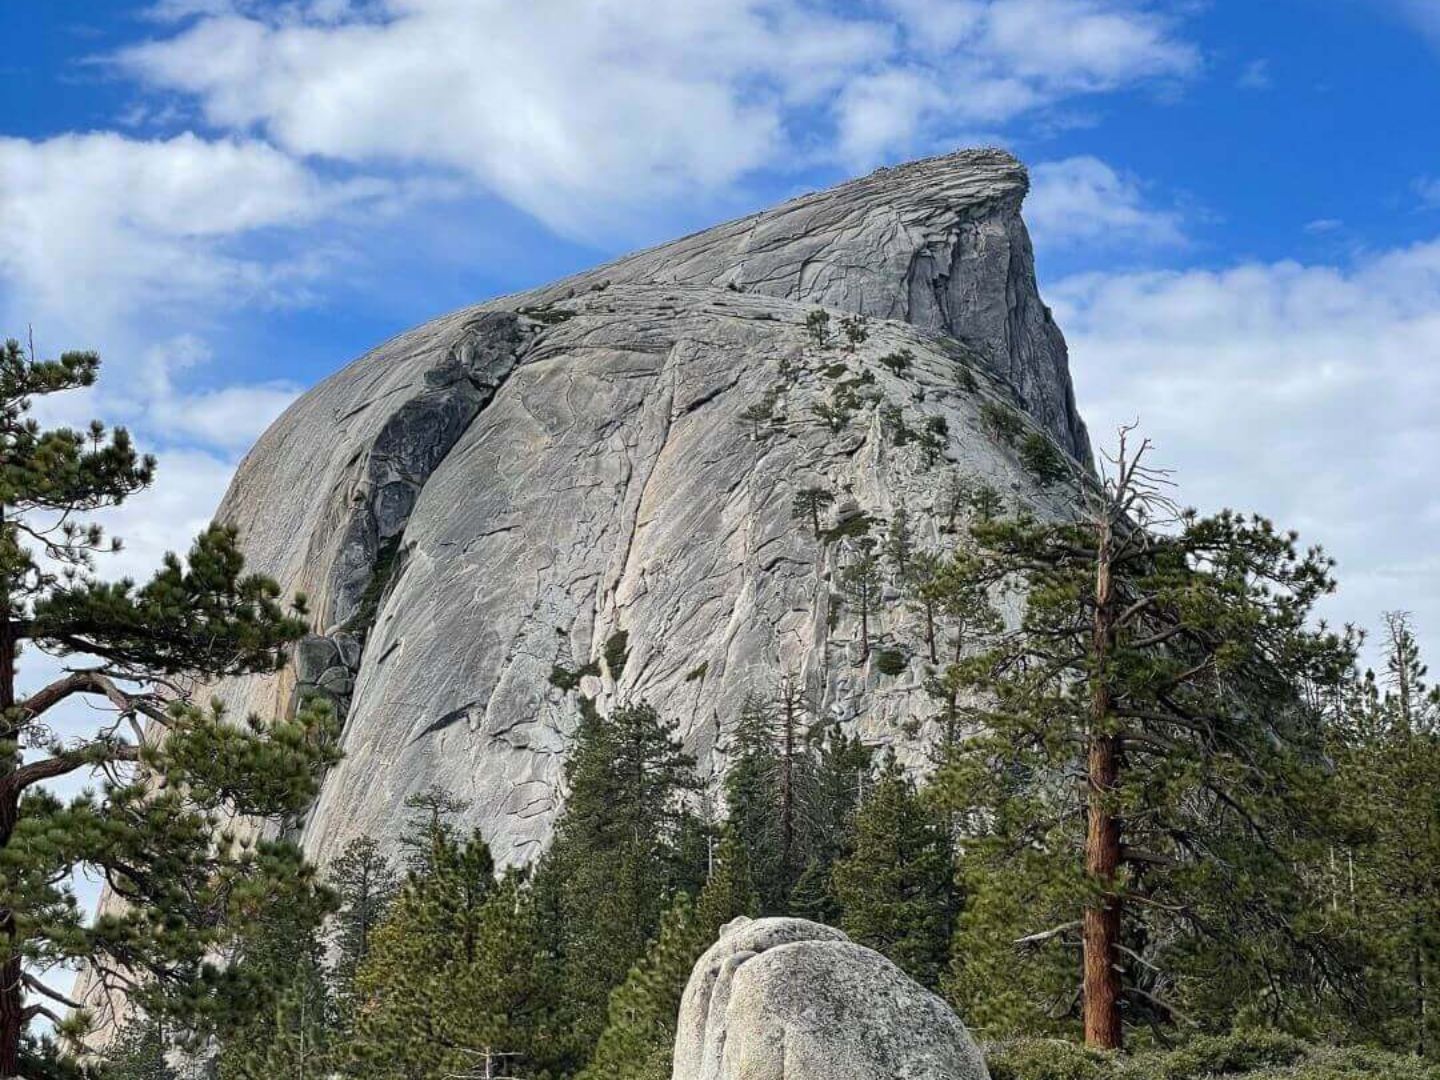
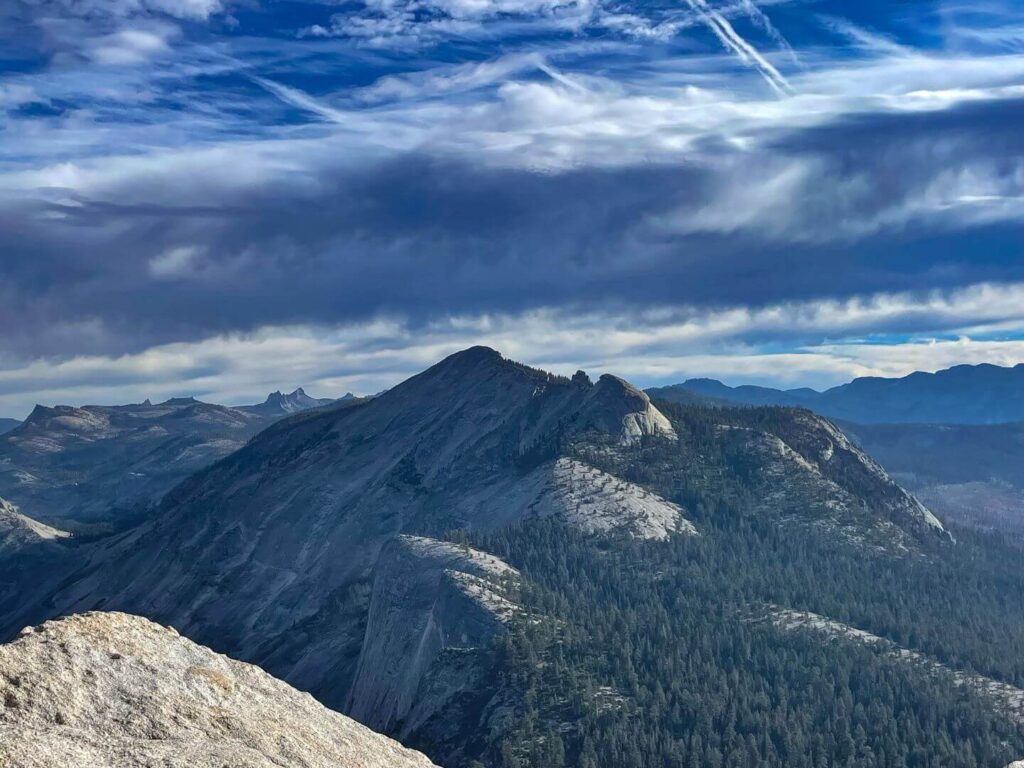
Half Dome is a gigantic, towering granite rock shaped like, well, half of a dome that has become an iconic symbol of Yosemite National Park. It’s a geological marvel that has captured the imaginations of hikers and outdoor enthusiasts for generations.
Half Dome Statics
How long is the Half Dome hike?
The length of the Half Dome hike is between 14 and 16 miles round trip. The length of the Half Dome trail depends on your route. If you hike the Mist Trail both ways, the hike is about 14 miles round trip. If you take the John Muir trail on the way down (a popular option), your hike is closer to 16 miles round trip but much easier on your knees.
What is the Half Dome Height?
The height or elevation gain from the bottom of the trail to the top of Half Dome is 5,457 feet.
What is the difficulty level?
Extreme. Yosemite National Park calls it “maybe the most strenuous day hike in any park.
How long does it take to climb Half Dome?
On average, the round trip hike takes 10-12 hours (it took us about 11.5 hours, but our descent was slow). Our time from the Mist Trailhead to the summit was 5 hours. However, on the way down we wanted to take our time to enjoy the views and enjoy a nice long lunch.
How long does it take to climb the Half Dome cables?
It took me about 20 minutes to climb the cables. It would have taken much less time if Gary had done it alone. However, if you are on the Half Dome hiking cables when it is crowded, it can take 45 minutes to reach the summit.
Planning Your Half Dome Hike
California’s Half Dome is a crown jewel of Yosemite National Park. Planning, including getting the appropriate gear, is essential before embarking on this adventure.
Permits and Reservations
Permits are only required when the cables are up. The cables are usually up beginning the Friday before the last Monday in May (Memorial Day) through the day after the second Monday in October. However, the snowpack from the prior season can delay the start of the cable climbing season.
You can hike Half Dome without the cables, but you need a serious set of winter climbing skills.
Half Dome Lottery System
The preseason lottery is the most common way to secure a permit for the Half Dome hike. The lottery typically opens on March 1st and runs through March 31st.
Applying for a Half Dome permit is easy. Applications for permits are submitted online, and the drawing occurs in early April. You can apply for up to 6 permits, and you’ll need to pay a nominal application fee. Keep in mind that competition for these permits can be fierce. The first year I applied, I didn’t get a permit. But the second time, I used the graph below created by the National Parks Service to assist with my date selection.
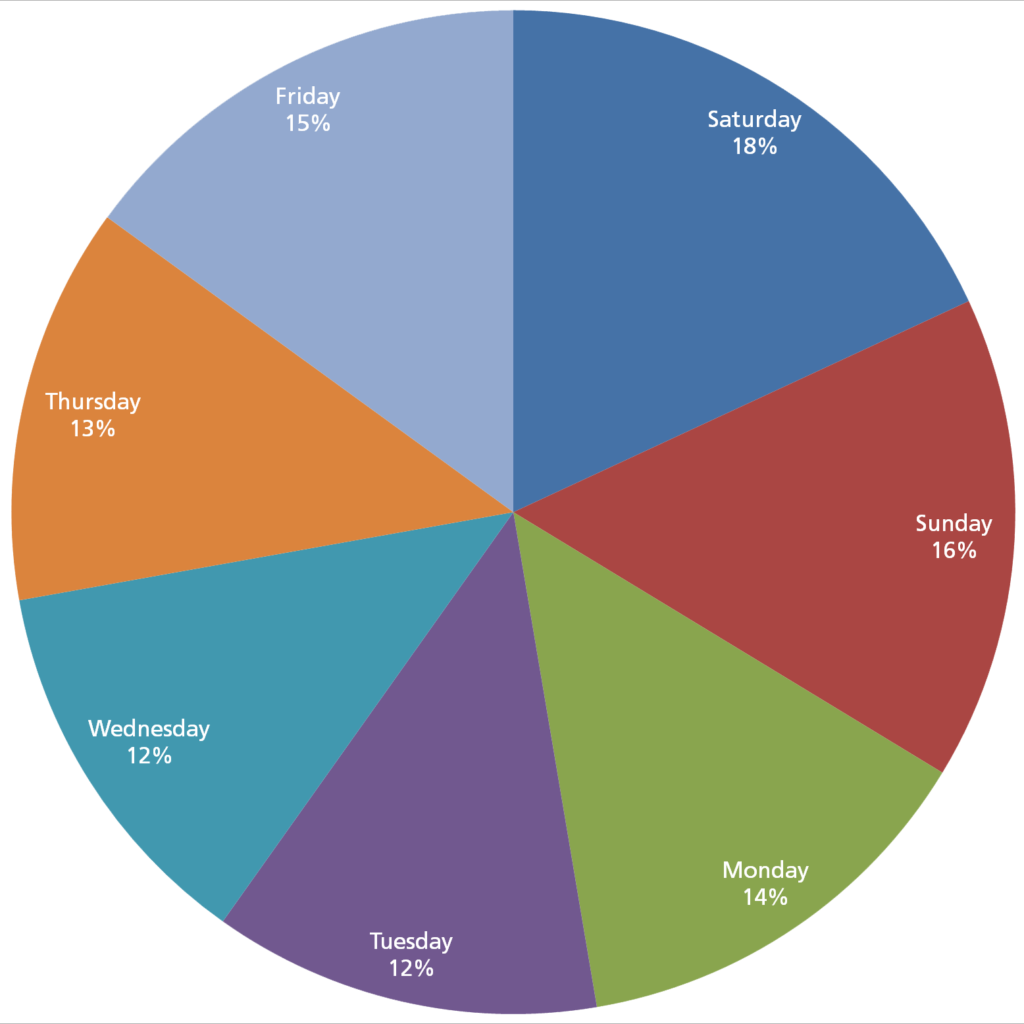
The National Parks Department put various statistics relating to the Half Dome permit lottery system together to help hikers decide on their preferred hiking dates. But bear in mind that the statistics don’t necessarily predict success rates.
The bar graph below shows how many permits have been requested for each date during the last Half Dome season.

To learn more about the Half Dome statistics, visit the National Park Service statistics page.
Applying for a Half Dome Permit
When applying, you must include the name of the permit holder and may specify the valid email address of an alternate permit holder. According to the National Parks Service, “applicants may be a permit holder or alternate only once on only one application during the preseason lottery.” A person’s name may appear on only one application as a permit holder or alternate.
Be forewarned that your application will be canceled if you apply multiple times as a permit holder/alternate permit holder. The names of the permit holder and alternate may not be changed once the application is submitted. Permits are not transferable.
Daily Permits
Only 225 hiking permits and 75 backpacker permits are issued daily for the hike up the subdome and the cables.
Gary and I were lucky enough to get a permit, and it was for our wedding anniversary. It was one of the most memorable ways we have celebrated!
Don’t lose hope if you don’t get a permit through the preseason lottery. If you don’t win the lottery, try one of the following three ways to obtain a permit:
- Reach out to people on bulletin boards like Facebook groups or places like AllTrails to see if anyone has an extra space in their group.
- If you are willing to take a flyer and go to Yosemite National Park, you can apply for one of the daily permits. These additional permits are awarded through a lottery system two days before the hiking date. For example, if you plan to hike on Saturday, you would need to apply for a permit on Thursday. If you are awarded a permit, you will receive an email notification of the results late Thursday night. You can also access the results online or by phone the next morning. The application period is from midnight to 4 pm Pacific time.
- If you are willing to take even more of a chance, you can hike to the base of the subdome and see if anyone has an extra space in their group. I saw a few people take this approach, and they joined a random group.
Pro Tip: You don’t need a permit if you only plan to hike to the base of the subdome.
Half Dome Fees
The permit process requires two separate fees. The first fee is a $10 non-refundable application fee.
The second $10 fee is only charged if you are awarded a hiking permit. The second $10 fee is fully refundable if you cancel your permit by 11:59 pm Pacific time the day before your hiking date or if the cables are not up on the date your permit is valid.
Yosemite National Park Entrance Reservation
A reservation may be required to drive into Yosemite National Park in addition to your Half Dome permit. Check the Yosemite National Park website for dates and times when a reservation is required to enter the Park.
What I Wish I Knew Before I Started My Hike

I did a massive amount of research before we hiked Half Dome. But there is always something you wish you knew ahead of time. Here are a few of those things:
- I didn’t realize how much forearm strength it would take to climb the Half Dome cables.
- The hike down Half Dome took longer than anticipated because my legs were so tired.
- We way overpacked our food supply, making our packs heavier than necessary. Don’t get me wrong, you need a fair amount of food for energy, but we had food for days.
- Make an accommodation reservation as soon as you get your hiking permit. The spots fill up quickly. Curry Village/Half Dome Village is the ideal place to stay because it is within walking distance of the trailhead and near food options.
Half Dome Hiking Season
The Half Dome hike is typically open from late May through early October, weather permitting. The best time to attempt this hike is in the summer or early fall when the cables are in place and snow and ice have melted. Avoid attempting the hike in adverse weather conditions.
What time should I start my Half Dome Hike?
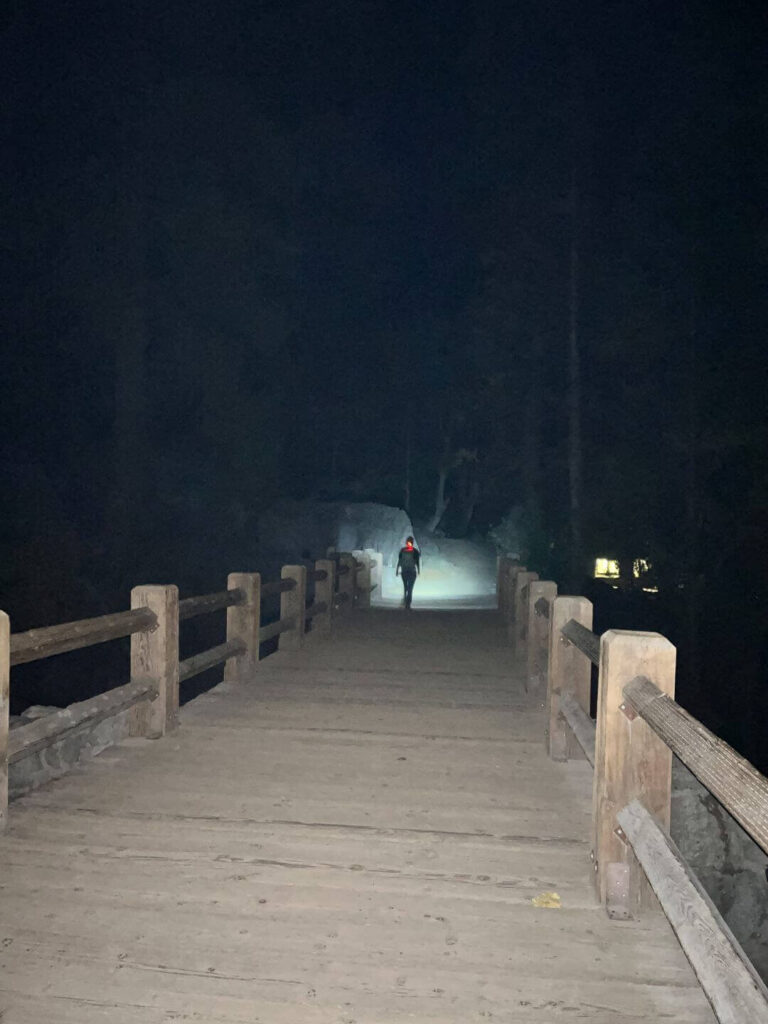
Early! I cannot stress the importance of starting early. We left Curry Village at 3:30 am and were on the trail by 4 am. It seems crazy to start that early, but trust me, it’s not. Once Gary saw the crowds of people headed up the subdome as we were headed down, he agreed that we made the right decision to leave early.
Here are my top 10 reasons to start your hike early
- Very few people were on the trail at 4 am, so the hike was quiet and peaceful.
- Hiking in the dark is a neat experience. We had good headlamps, so hiking in the dark wasn’t an issue for us. We had more than enough light.
- Getting to the trailhead early is crucial if you need a parking spot. You don’t want to spend the morning looking for parking and adding extra miles to your hike.
- The weather is often best in the morning, and storms are more likely to roll through in the afternoon. If it is raining or the ground is slick, I highly suggest you skip the Half Dome cables. The ascent up Half Dome is not worth dying over.
- We reached the cables by 8 am, and there were only a few people on them, so I didn’t feel pressured to move faster than I was comfortable.
- There are very few people descending the Half Dome cables while you are headed up, and there is less of a chance of people trying to pass you.
- There are no crowds at the summit.
- Leaving early means you will likely be back down before it is dark. While a headlamp helps with the darkness, you will probably be exhausted by this point, and it is safer to come down in the daylight.
- The trail at sunrise is stunning.
- You don’t have to worry about people trying to pass you on the Mist Trail stairs or at the subdome.
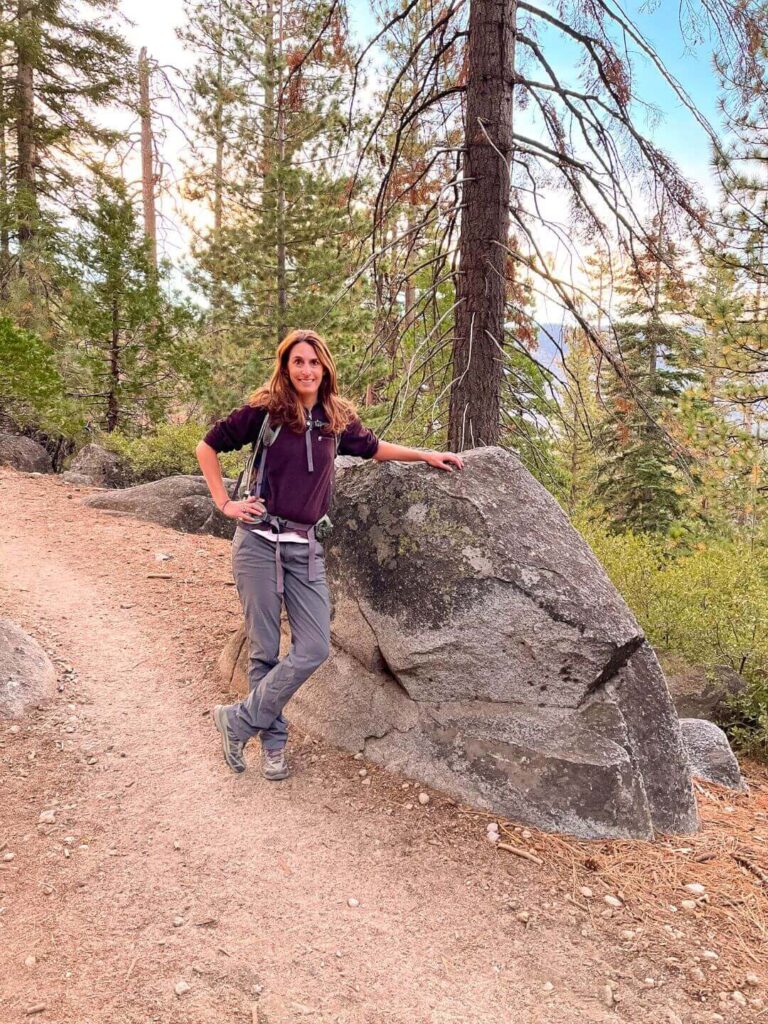
The Half Dome Hiking Trail
Once you’ve secured your permit and prepared for the journey, it’s time to hit the trail. The hike to Half Dome is a spectacular adventure, offering stunning scenery and unique challenges. In this section, I will guide you through the trail, from its starting point at Happy Isles to the exhilarating ascent up the cables and back down.
Starting Point: Mist Trail near Happy Isles
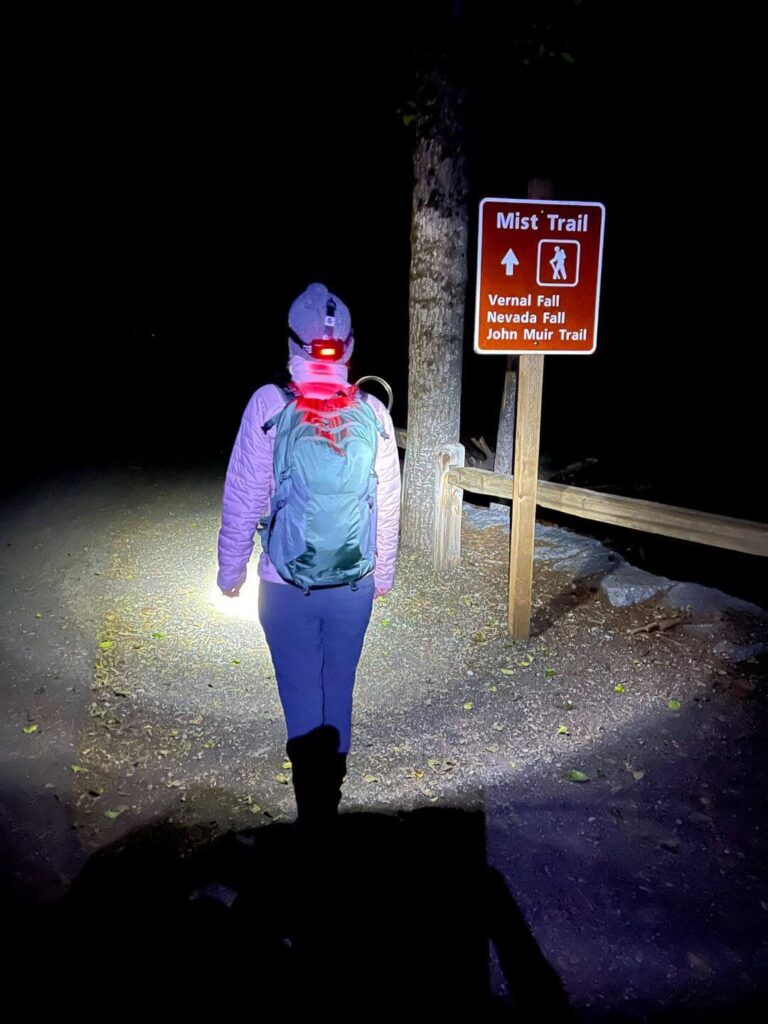
The trail to Half Dome begins at the Mist Trail. There is a parking lot near the trailhead. However, if you are staying at Curry Village (now Half Dome Village) in Yosemite Valley, you can walk to the trailhead. The flat walk takes about 15-20 minutes.
Cross the car bridge and head up the paved path to get to the trailhead. You will see a trailhead sign for the Mist Trailhead. Even if you are starting at night like we did, it is easy enough to find the trailhead.
If you are starting later in the day, you can take the free shuttle to Happy Isles. Be sure to check the shuttle schedule to make sure it is available to take you back to your destination within Yosemite at night.
Pro Tip: The day before the hike, walk over to the trailhead so it’s easy for you to navigate on the day of your adventure. We opted to do this, removing the stress of finding the trailhead in the dark.
Mist Trail vs. John Muir Trail
At Happy Isles, you’ll choose between the Mist Trail and the John Muir Trail routes. The Mist Trail is the shorter and more direct route, while the switchbacks on the John Muir Trail add extra mileage but are less steep.
Your choice between these two trails may depend on your fitness level, the weather, and your preferences.
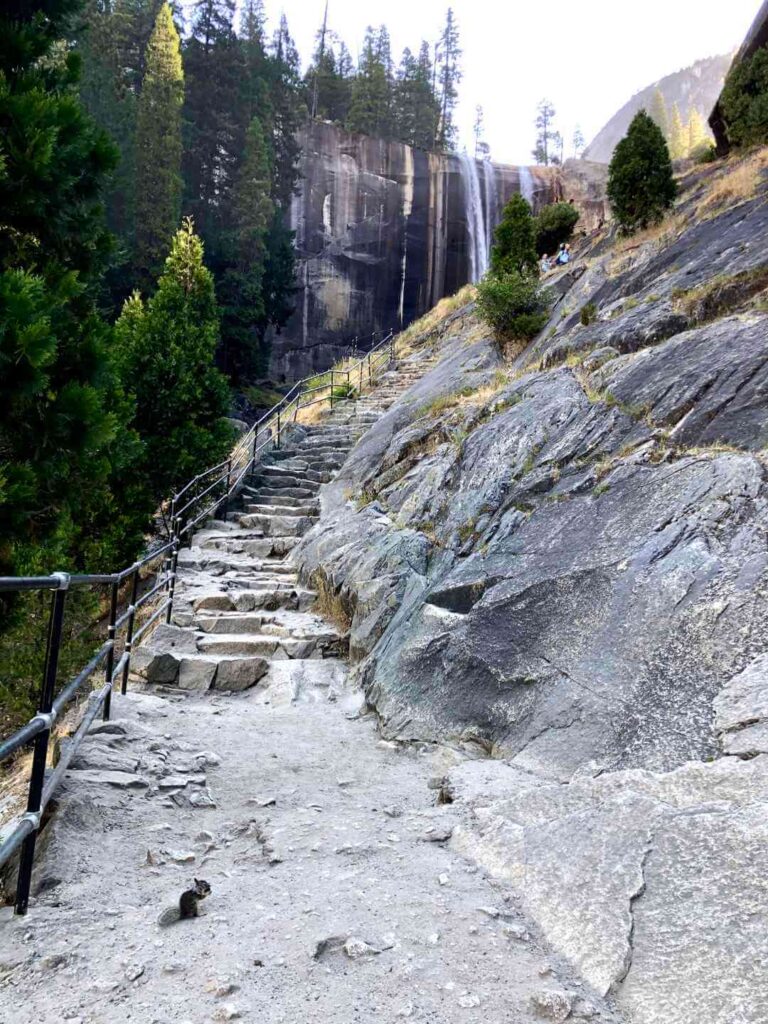
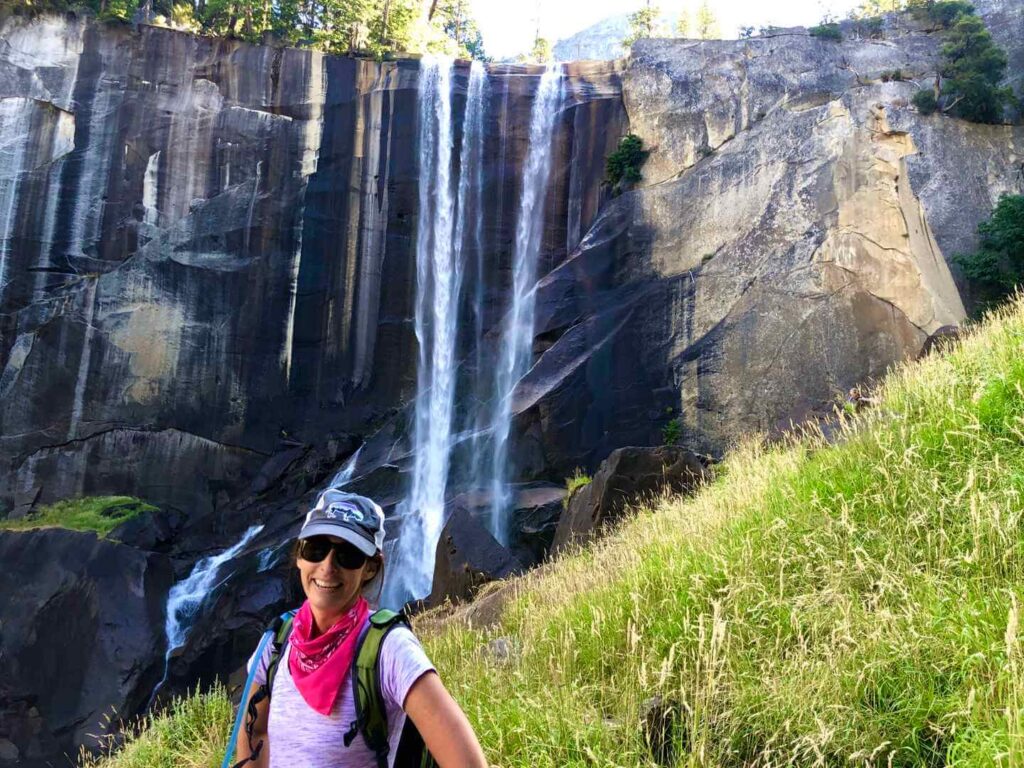
The Mist Trail offers spectacular close-up views of Vernal Fall and Nevada Fall but is steeper and can be slippery due to mist from the falls. This route also requires climbing hundreds of stairs. There are guardrails at points of the trail. I often used these, not because I needed them, but because why not?
The John Muir Trail is less steep and generally safer in wet conditions. We opted to hike up the Mist Trail because it is more direct.
Pro Tip: There is a bathroom and water filling station on the Mist Trail just after you cross the bridge.
Vernal Fall and Nevada Fall
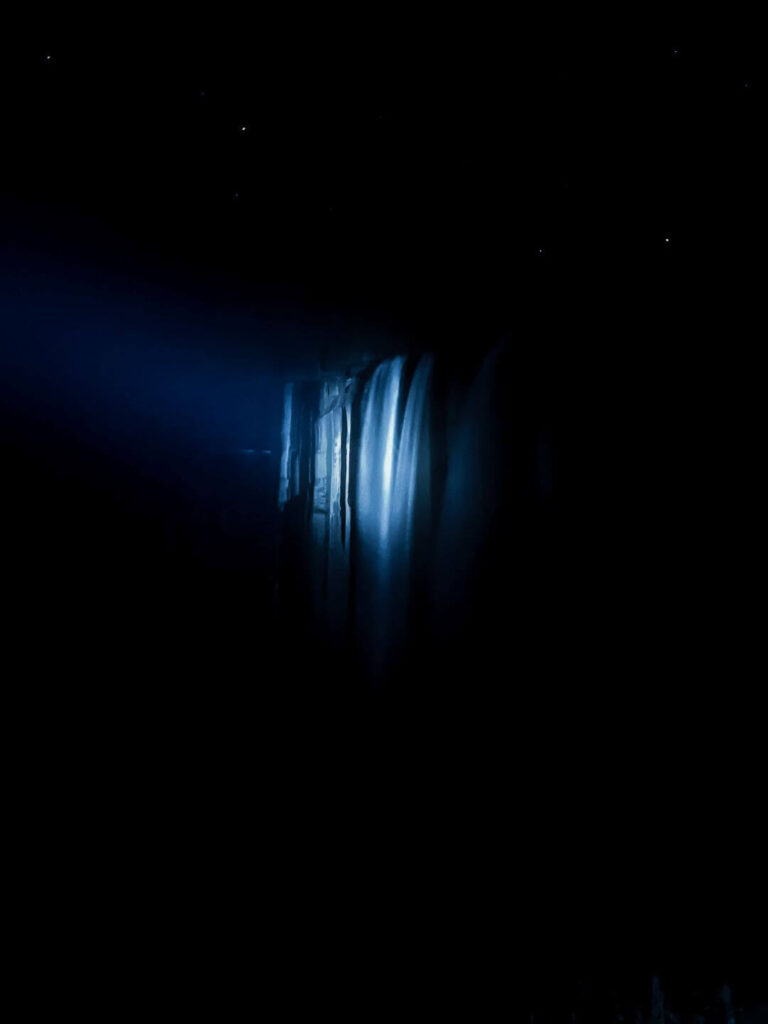
As you climb the Mist Trail and get near the top, you will hear the water flowing over Vernal Fall. Listening to the fall in the dark is a different experience than seeing it in the daylight.
Once you get to the top, keep going!
Silver Apron and the Emerald Pool
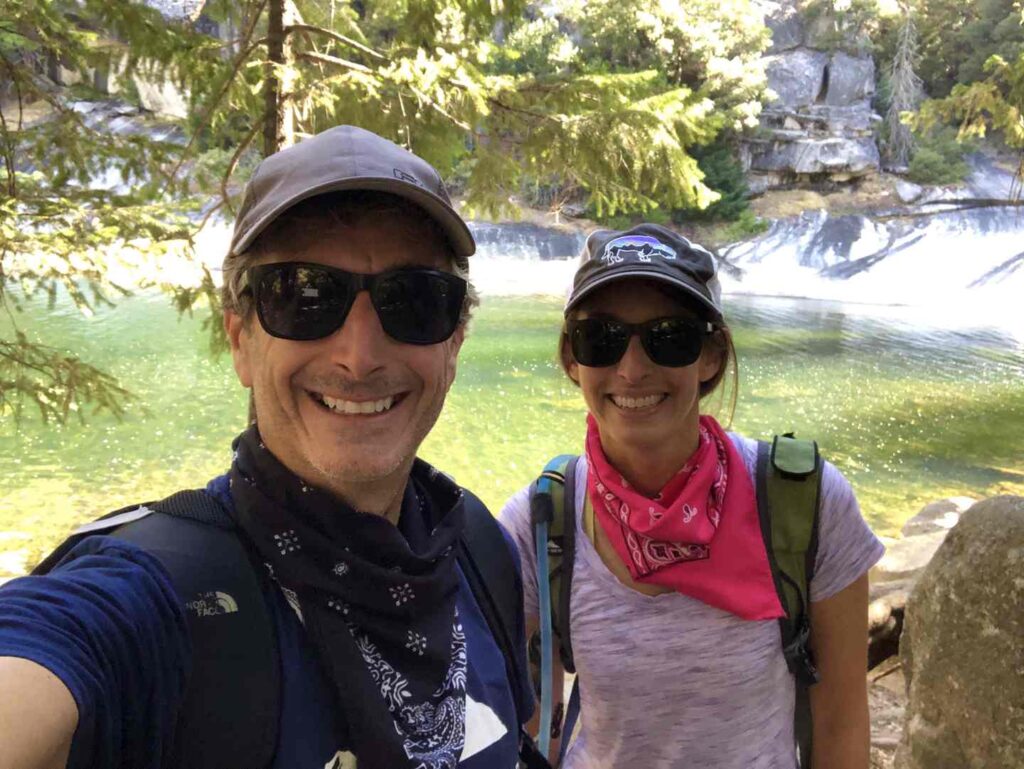
The next section of the hike will be the Silver Apron and Emerald Pool. I always seem to get turned around when hiking in this area. Out of an abundance of caution, I downloaded the AllTrails map. I was happy to have the map because we needed to check it a couple of times in this area. Turns out we were off trail. I would have eventually figured it out, but I didn’t panic because I had the trail map. Alternatively, consider using a compass and topography map.
If you need to fill up your bottle with water, this is the area to do it. But be careful because the water moves fast.
Pro Tip: If you are using AllTrails, download the map before you get to Yosemite. The cell service is terrible, and it can be impossible to download anything in the Park. The map should be downloaded on your phone so you don’t have to rely on cell service.
Pro Tip: If you need to use the bathroom, there is a bathroom option near the Silver Apron and Emerald Pool.
Nevada Fall
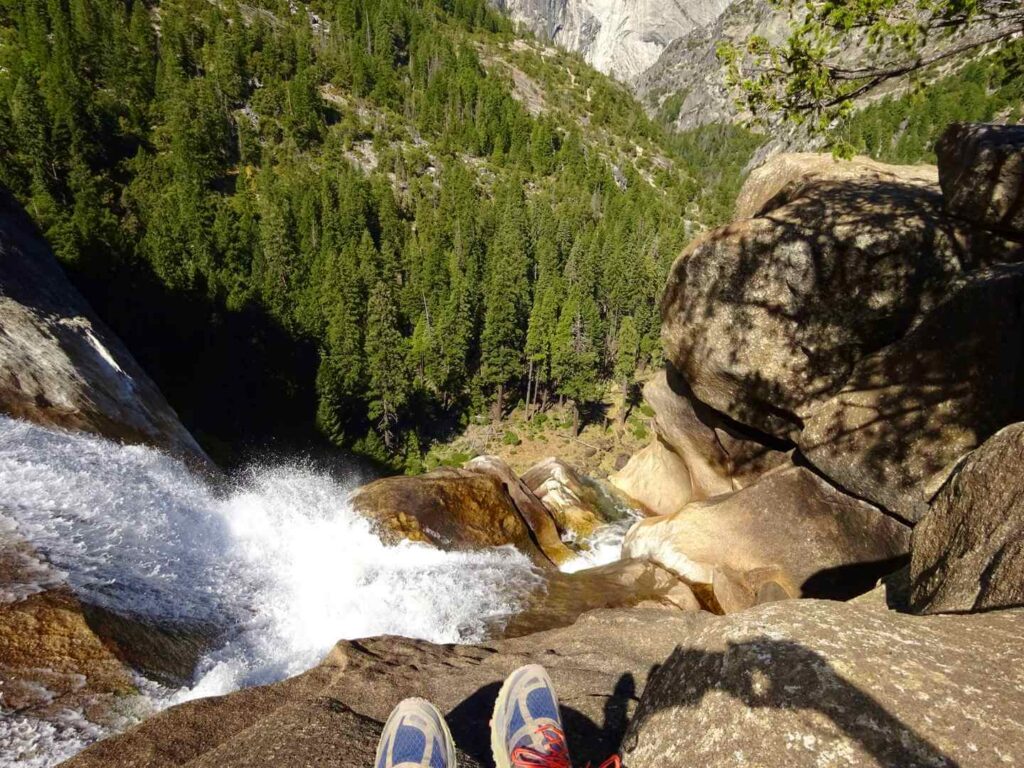
The next major test of your endurance will be the hike up to Nevada Fall. The hike is not for the faint of heart and requires strong legs. This trail is not for those with any fear of heights since there are no guardrails on the side of the trail.
At some points, the switchbacks feel more like climbing a never ending set of stairs. The effort is worth it, though. The views at the top of Nevada Fall look over Yosemite Valley are stunning, pictured above.

Pro Tip: Once you get to the top of the trail, there is a restroom to your left.
Pro Tip: Remember to keep drinking water.
Hiking up to the Subdome
The hike up the subdome was a little tiring. The trail itself wouldn’t be so bad if I hadn’t just hiked over 2,500 feet of vertical in a short amount of time. I was happy to have a fair amount of flat area to recharge. As you get closer to the subdome, the flat trail gives way to switchbacks up the mountain.
Pro Tip: The last bathroom is on this section of the Half Dome hike at the campground between the top of Nevada Fall and the subdome. It is on your right as you hike up. You would miss the bathroom if you weren’t looking for the campground, but trust me, it’s there.
Climbing the Subdome
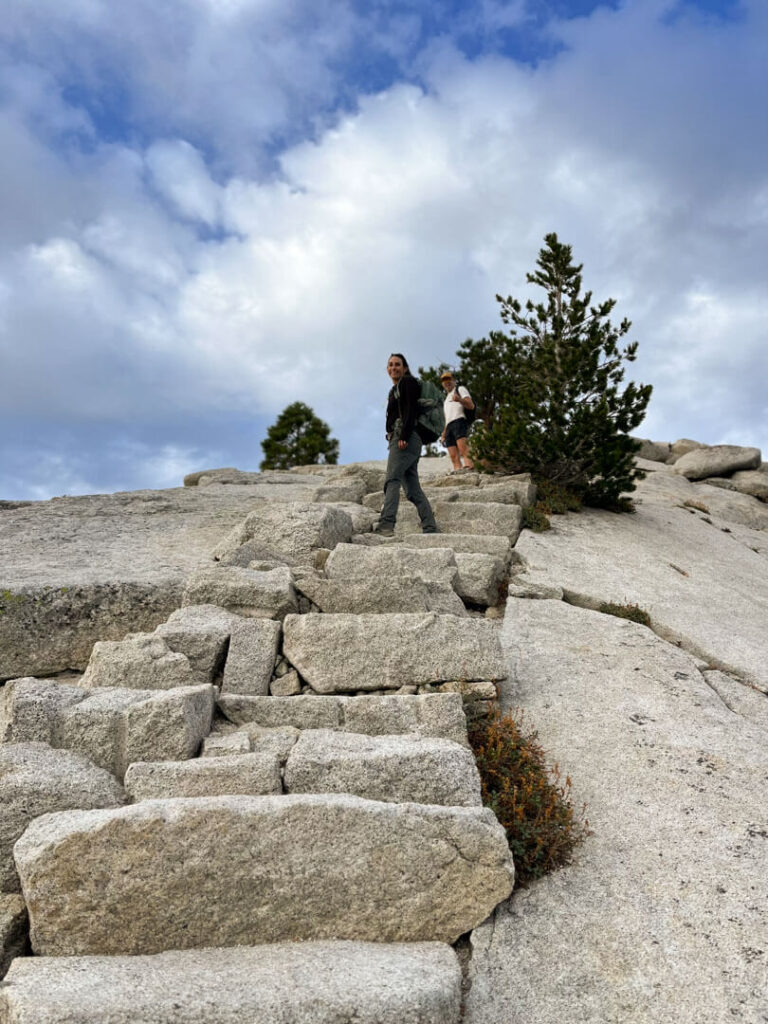
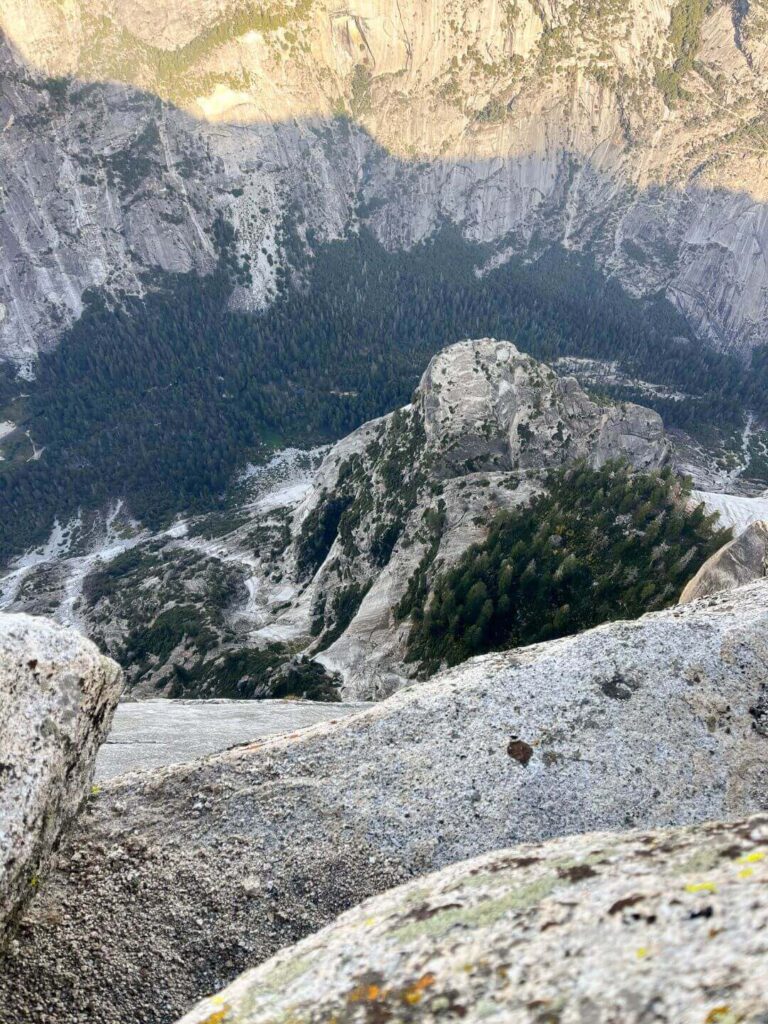
You will immediately know when you reach the subdome. It is a granite hump that precedes the ascent of Half Dome.
There is a flat area before the subdome that is ideal for getting ready to climb Half Dome. People tend to ditch some of their gear in the bushes so they don’t have to carry it up the subdome and the Half Dome cables. However, we decided to climb with our backpacks.
Before tackling the subdome, we each filled an extra water bottle with a dehydration pack and mixed it with water to give us an energy boost and rehydrate before our climb. We also had a snack to refuel our bodies.
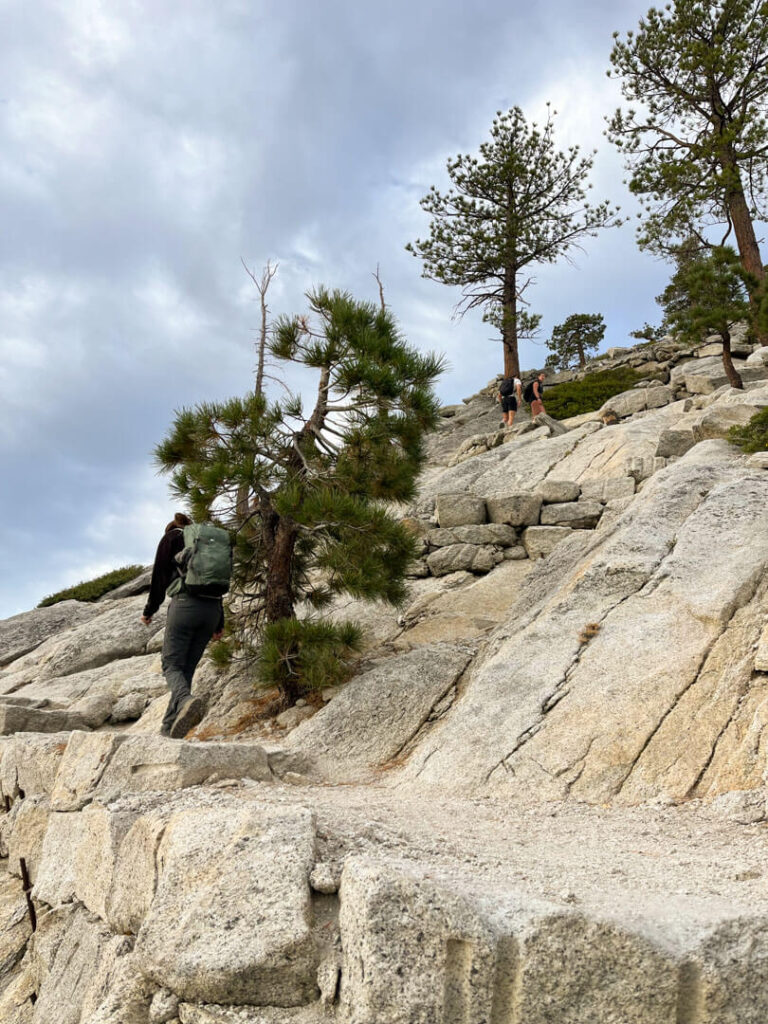
Hiking up the subdome is a strenuous workout. Be prepared for the challenges that await, and pace yourself. The switchbacks are steep steps with no guardrails. Some people think climbing the subdome is harder than the cables.
My legs were tired, but fortunately, the climb was fairly quick.
If you reach the subdome early, as we did, the National Park Rangers may not be there to check your permit. However, they will likely be there by the time you make it back down. On our hike, they were checking everyone’s permit coming off the subdome. Note that there are fines for hiking without a permit.
The permit holder or the alternate must be present with the entire group at the base of the subdome. You will need to show your permit and identification that matches the name on your permit.
The Famous Half Dome Cables
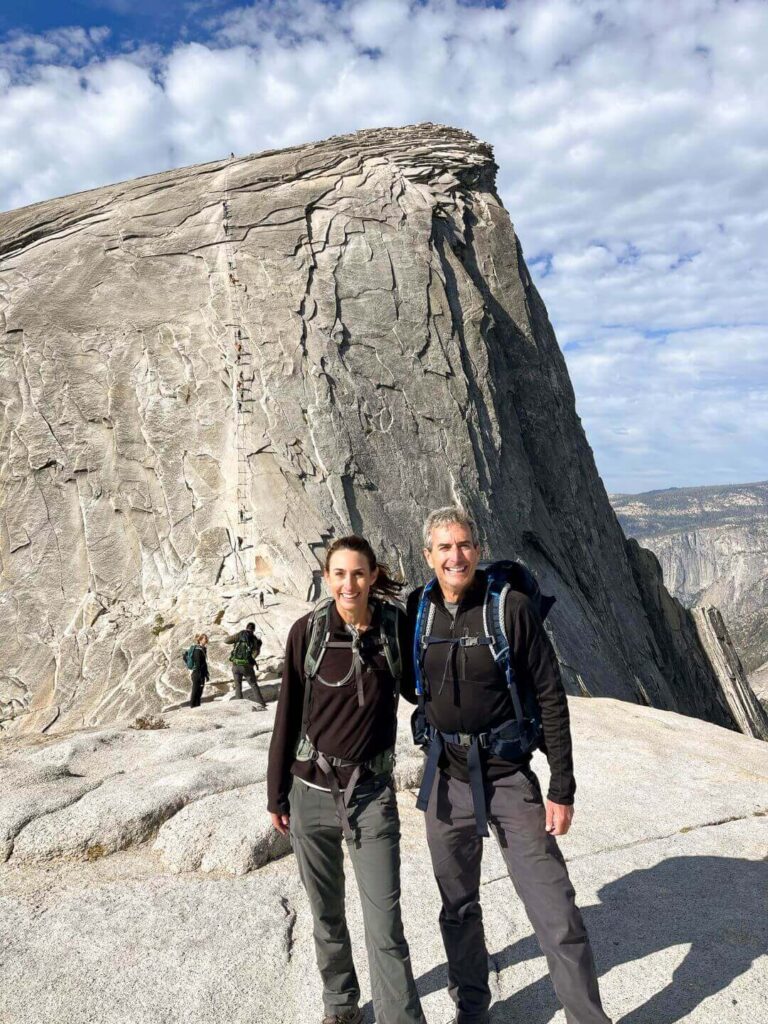
Standing at the bottom of the cables and staring up at the summit of Half Dome was awe-inspiring. Like most of you, I researched the final ascent to get varying first-hand accounts of what to expect. Based on my research, I had two major concerns: 1) whether the weather would be favorable enough for us to do the climb and 2) the difficulty of the climb.
Fortunately for us, the ascent looked manageable when we reached the top of the subdome and walked across the granite shelf. But it is all based on your perspective. Because I am a researcher by nature, I had a good understanding of what to expect. On the other hand, Gary looked at the cables and the 45-degree angle of the 400-foot climb ahead and said, “huh, this looks harder than I expected.” Of course, he could still run circles around me, but the point is that knowing what you are getting yourself into and your skill level can make a difference in a successful climb.
Ascending the Half Dome Cables
We reached the cables somewhere around 8:15-8:30 am, and only a few other hikers were in the area. The minimal amount of people we saw is in stark contrast to the pictures I have seen of lines of people on the cables.
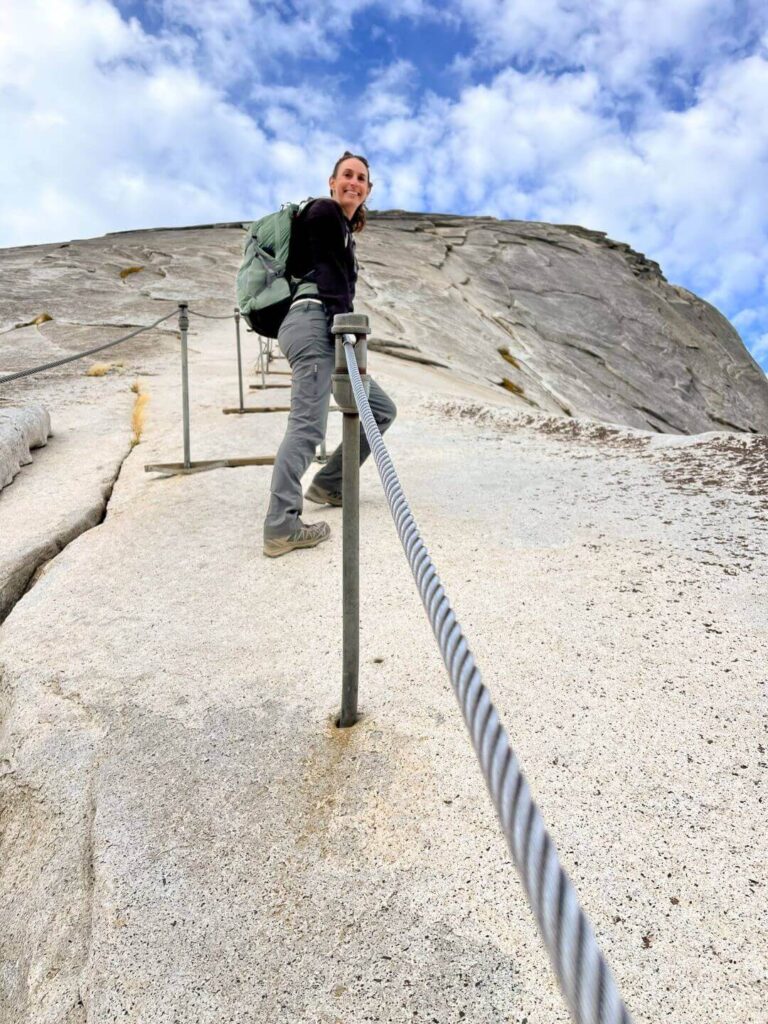
Hikers ascend the last section of Half Dome by using a cable system of wooden boards and metal poles with a cable running the length of the climb. The two cables are spaced about three feet apart. Climbers going up use the cable on the right, and climbers coming down use the cable on the left.
Each side has metal poles and wooden boards spaced about six feet apart. I found the wooden boards to be a life safer. They are pushed up against the base of the metal pools, giving hikers a sturdy foothold to catch their breath.
When pulling yourself on the cables, do not pull on the poles. They can come out. Yes, that’s right, the poles can pull out of the mountain. It happens all the time. I accidentally put my hand on one pole and felt it start to come out of the hole. Don’t make that mistake because it is very scary.
While climbing up Half Dome, only one other person was behind us. The guy was so patient and supportive that I didn’t feel pressured to hurry up. The climb took about 20 minutes, but people do it much faster.
The hand-over-hand climb was exhausting, and my forearms were killing me when we reached the summit.
If the cables are too intense for you, you can turn around. During our climb, a 12-year-old girl turned around about a third of the way up because it was too much for her. I give her a lot of credit for making the wise decision to turn around rather than risk her and her mother’s life.
After climbing Half Dome, I am shocked that the National Parks Service installed cables to help everyday hikers like me make the climb. It is one of the most dangerous things I have ever done, and I have run off a cliff in Brazil for a hang-gliding adventure. While I never felt in danger (probably because I was so focused on pulling myself up the cables), there is a possibility that you will die or severely injure yourself. The best word I can use to describe the cables is “insane.”
Pro Tip: Forearm strengthening should be part of your pre-hike training.
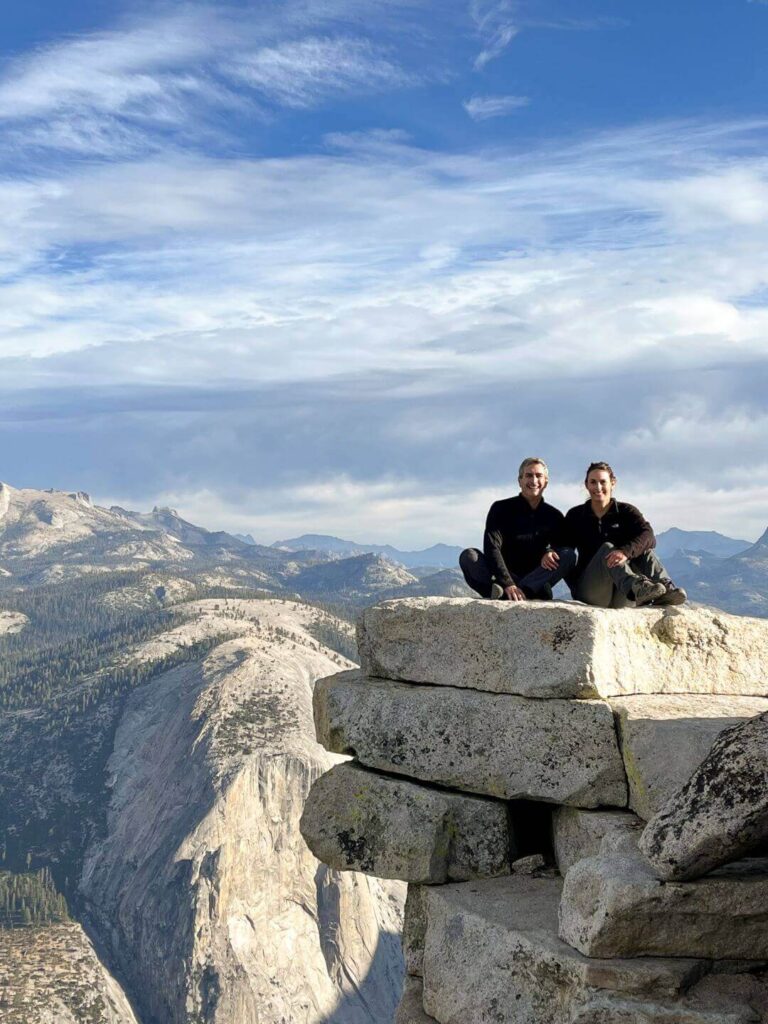
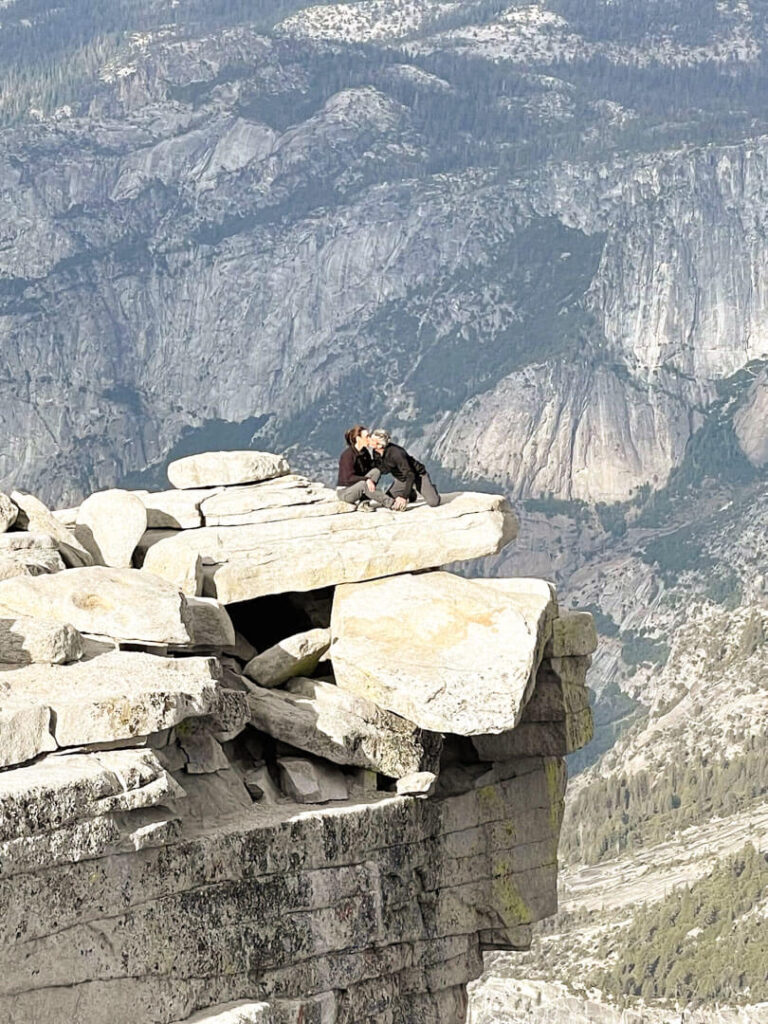
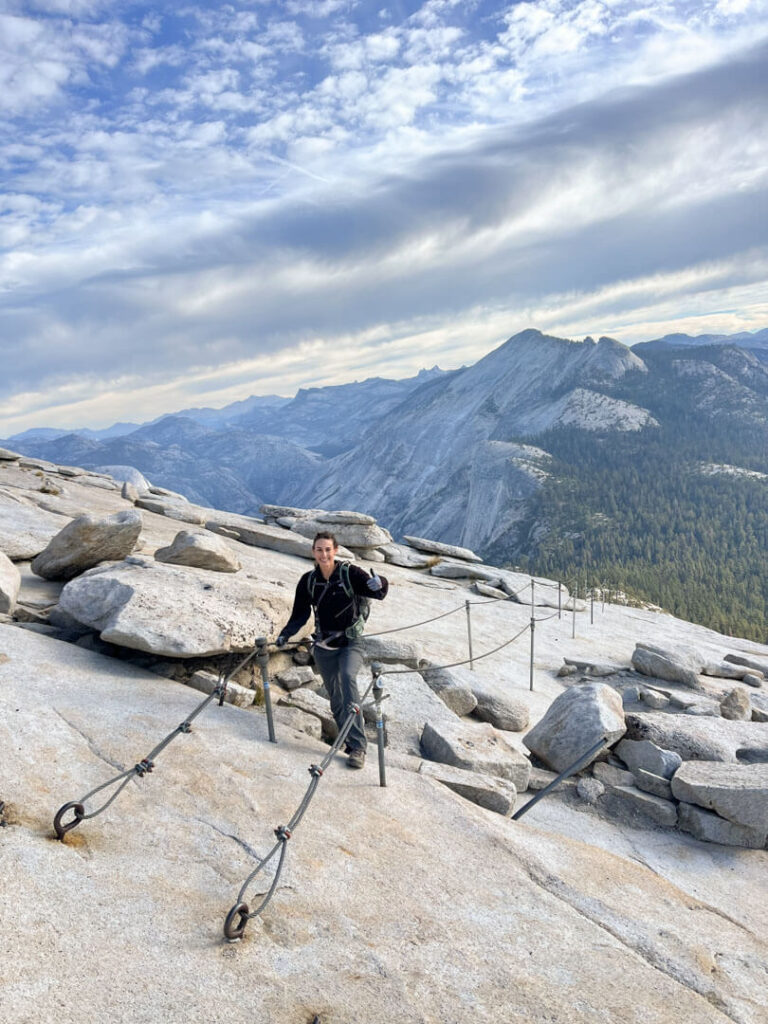
The Half Dome Summit
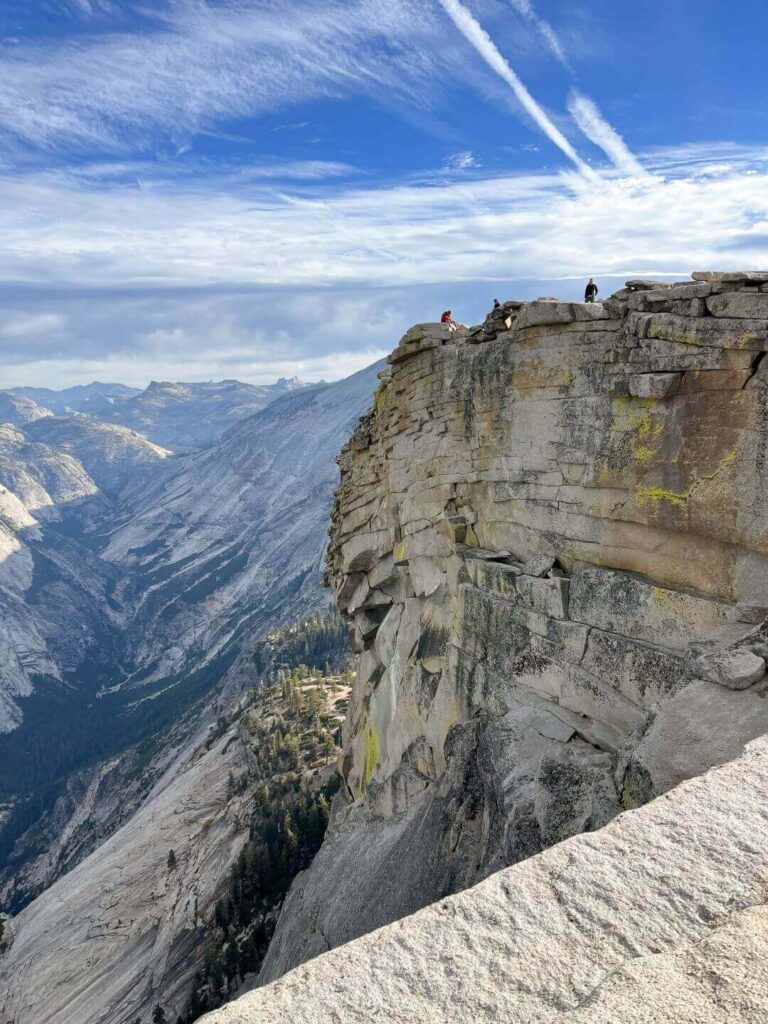
After successfully ascending the cables, you’ll reach the summit of Half Dome, where breathtaking panoramic views of Yosemite Valley and the High Sierra await. The ground is relatively flat and easy to navigate. Take time to congratulate yourself, enjoy the incredible beauty surrounding you, and drink some water.
I will be honest, I didn’t love being on the summit. There were 20 knots winds blowing when we reached the top. I was a little freaked out between the winds, my exhausted arms, and wondering how I would get down.
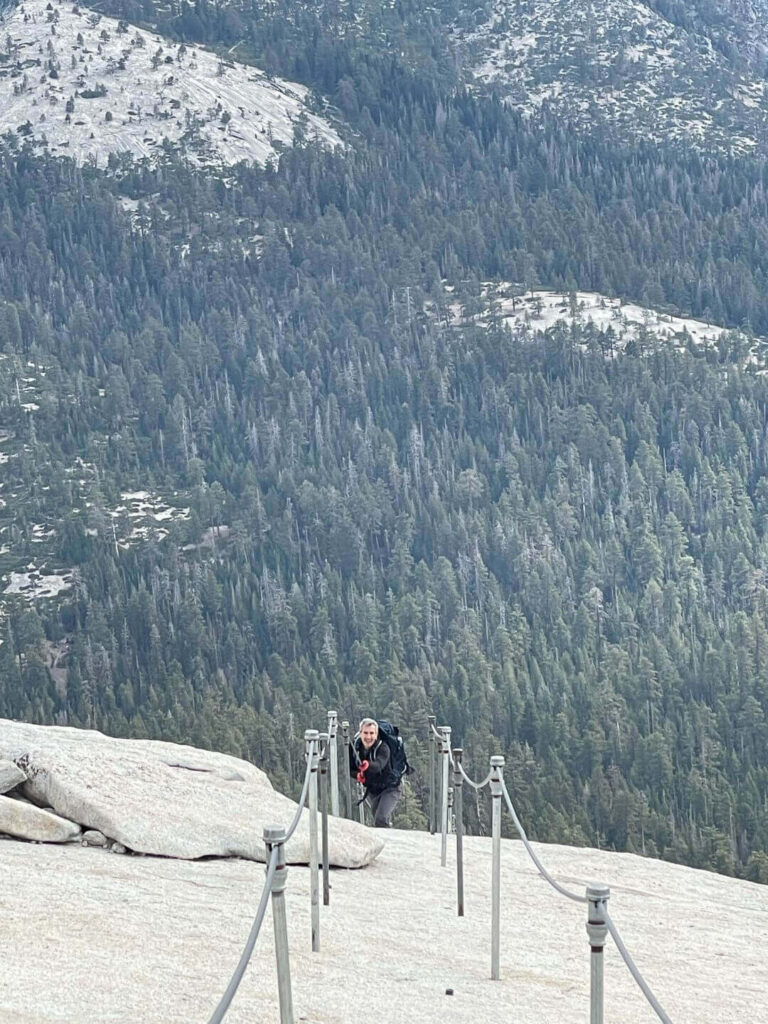
Descending the Cables
The descent was easier than the climb. I could use my legs more than I could on the climb up, which relieved some of the pressure on my burning forearms.
The bad news is by 9:30 am, people were starting to flood up the cables. We saw a woman who was white as a ghost climbing the cables. The problem, which happens often, is because she was moving slowly, so was everyone else behind her. Some people will try to go around someone in that position, but I don’t recommend it. It is safer to be patient.
It took us less than 20 minutes to climb down to the subdome.
Descending the Subdome
By about 10 am, the Subdome was full of people. Unlike when we hiked up and only encountered a couple of people, by 10 am, there was a line of people on the Subdome, anxious to get to the base of Half Dome. Navigating down wasn’t too bad. The trail is very narrow, so it’s not easy to pass. So, a few people would come up, and then, when the trail was clear, a few people would walk down.
Half Dome Safety Measures
Hiking Half Dome is an exhilarating adventure, but it comes with its own set of challenges and responsibilities. Safety and proper trail etiquette are paramount to ensure a safe and enjoyable experience for yourself and fellow hikers.
Pick a Turnaround Time
The National Parks Service recommends that you pick a time to turn around to give yourself time to make it safely back down the hike. The example from the National Parks Service is to turn around if you don’t make it to the summit by 3:30 pm.
Keep Your Eye on the Weather
If you only take one thing away from the post, let it be the importance of paying attention to the weather. Yosemite’s weather can change rapidly; higher elevation conditions can vastly differ from the valley floor. Before starting your hike, check the weather forecast and be prepared for temperature fluctuations and sudden rain or thunderstorms. As you climb higher, keep your eyes on the clouds to see if a storm is coming through.
A major factor in deciding whether to climb the cables heavily depends on the weather for two reasons: 1) the rock can be incredibly slick, and 2) lightning is a significant risk.
A Slippery Granite Face
Thousands of people climb the cables every year, wearing down the granite from constant use. The granite is slippery when dry, so I cannot imagine how slick the rock gets when wet. My climb would have been ten times harder if not for wood planks about every six feet that prevent you from slipping off the rock face. However, in the rain, you could easily lose your footing and slide down the mountain.
Be Aware of Potential Lighting Strikes
It is common for lighting to strike near Half Dome. Yes, that is correct, lighting is a real issue. The top of Half Dome is flat, and you will be the highest point on the mountain. If lighting hits the mountain top, it can travel across the ground and reach you. If you don’t believe me, you can read a harrowing tale from 2023 about five people who huddled together at the top of Half Dome while waiting out an unexpected storm in a cave. Long story short, multiple people were hit by lightning, one person was knocked unconscious, and two people slipped while trying to climb down the slippery rock face.
Do I need gloves for the Half Dome cables?

Short Answer: Yes. For the sake of your hands, consider buying gloves. Otherwise, the steel cable can do severe damage to your hands.
I used the Nitrile Work Gloves, which are well worth the price. The amount of grip and the flexibility of the gloves were perfect for me. Using gloves is one of those easy things you can do to keep yourself safe without much effort. Gloves are just one of the necessary gear items you need for the hike.
Should I wear a safety harness?
Whether to wear a safety harness is a deeply personal question. I am not going to tell you what to do. Instead, I will tell you what I did and why.
Ultimately, I decided not to wear a climbing harness. I made the right choice for me, but that doesn’t mean it is right for you.
After doing significant research and taling to folks at REI, I decided that constantly clipping in and out of the cables would make my journey much harder.
For those who have done a Via Ferrata climb, you know that as you move up the mountainside, you have to unclip and reclip every six feet or so. On the Half Dome cables, I was so focused on making it the next wood plank that having to think about clipping in and out would be too much for me. In addition, I liked having two hands on the cables since my arms were burning. With a harness, I would have to take a handoff to clip in and out.
However, I encourage you to do your own research. Alpine Escape Yosemite Rental and the Hiking Guy have informative posts about safety harnesses for Half Dome.
Do I need hiking poles?
Hiking poles are not necessary, but many people use them. I was not one of them. However, I can see why people used them. My legs were exhausted when we were headed down and navigating the rocks would have been easier if we had hiking poles. Although, we could have also taken the John Muir Trail and avoided most of the rocky terrain.
Should I leave my jewelry at home?
Yes! I didn’t think wearing a ring it would be an issue because we were hiking. But I broke a prong and lost a small stone somewhere along the way. Thankfully, it wasn’t a big deal to have my ring fixed. But take it from me: wearing jewelry on the hike is not worth it.
Required Gear and Equipment for Hiking Half Dome
Before reaching the hike, it is necessary to make sure you have the proper gear.
- Footwear: Sturdy, comfortable hiking boots with good grip are essential. Ankle support and protection are necessary, especially during the descent. I highly recommend you invest in a good pair of hiking boots. I like the Vasque hiking boots. Gary prefers the Solomon waterproof hiking boots.
- Clothing: Dress in layers to accommodate varying temperatures. Moisture-wicking base layers and socks, a breathable mid-layer, and a waterproof shell are recommended. Don’t forget a hat and sunglasses for sun protection.
- Backpack Essentials: Carry a backpack with essentials such as water, snacks, a headlamp, a first-aid kit, a multi-tool, sunscreen, and a map. Keep your pack as light as possible; you’ll need to carry it up the cables.
- Water: Hikers will want to carry at least 4 liters of water. Between Gary and I, we had 10 liters of water (bladder and a back up water supply container) and drank all but 1 liter, and it was a cool day. Sufficient water is a critical element to a successful Half Dome hike. Without it, you can face severe dehydration.
While we opted to carry all of our water, there are places along the trail to fill up. There is a filling station on the Mist Trial about 20 minutes into the hike. If you have a water filtration bottle, you can also fill up near the Emerald Pond. I recommend carrying your water in a bladder so you don’t have to deal with rationing your water and resupplying. Having sufficient water is one of the keys to successfully climbing Half Dome.
For a full gear list, check out my Half Dome packing guide.
Half Dome Fitness and Training

Physical Preparation
The Half Dome hike is strenuous and involves an elevation gain of about 5,400 feet. One of the things I wish I had known before climbing Half Dome is the amount of forearm strength the climb would require. When I said my forearms were on fire, I was not kidding. The pain was real, and I had to fight through exhaustion to make it to the top.
Even though I had a regular fitness regimen that included cardio, strength training, and hiking, I didn’t do enough forearm exercises. It makes sense that you need forearm strength since you pull your body hand over hand up a 45-degree pitch with little help from your legs.
For cardio training, I recommend finding hikes that mimic the difficulty of Half Dome before you head to Yosemite. Look for at least one hike with about 4,000 feet of vertical and at least 12 miles to test your endurance. While hiking, carry the same weight you plan to carry on the day of your climb. Doing this type of hike gave me confidence for our big day.
Mental Readiness
Mental preparation is just as necessary as physical fitness. You need to be mentally prepared for long distances, steep and rocky trails, slippery stairs, and the exposed ascent up the cables.
I was anxious about climbing Half Dome and had trouble sleeping before our hike. It turns out I was more prepared than I thought (which I should have known since I overprepared for everything) and didn’t have anything to worry about.
Recognize in advance that not everyone hikes the cable portion of the trail and if you don’t feel comfortable heading up the cables, that is okay.
Hiking in a Group vs. Solo
While hiking solo can be a rewarding experience, it’s often safer to hike with a group, especially if you’re not an experienced hiker. Having others with you provides a safety net in case of accidents, and the collective knowledge of the group can be valuable. If you choose to hike solo, inform someone about your plans and expected return time, and carry a phone with the ability to make an SOS call in case of emergency. Regular cell service is unreliable in Yosemite.
Leave No Trace Principles
Yosemite’s natural beauty is preserved through responsible hiking and outdoor ethics. Follow Leave No Trace principles to minimize your impact on the environment:
- Stay on designated trails: Avoid creating new paths, as the fragile alpine ecosystem is easily damaged.
- Pack it in, pack it out: Carry out all your trash and dispose of it properly. Leave nothing behind.
- Respect wildlife: Observe animals from a distance and never feed them. Keep your food secure to prevent wildlife from becoming accustomed to human food.
- Be considerate of other hikers: Keep noise levels down (i.e., if you listen to music, use headphones and not a speaker), yield the trail to those moving uphill, and maintain a friendly and respectful attitude toward fellow hikers.
Wildlife Encounters
Yosemite is home to diverse wildlife, including bears. I didn’t see any bears on the trail, but I have seen one in Yosemite Valley. According to the National Park Service, if you see a bear, do the following:
- Stay calm
- Stand your ground, make yourself look as large as possible, and slowly wave your arms.
- Pick up small children and prevent them from making noises. You don’t want a bear to think they are prey.
- If the bear is stationary, move away slowly and sideways so you can keep an eye on the bear.
- Do NOT run or climb a tree. Bears can climb trees.
- Do NOT try to take a selfie – this is how people die.
Camping Options
Backcountry Camping
Yosemite offers a range of backcountry camping opportunities for those who wish to extend their stay. Wilderness permits are required for all overnight wilderness camping, and they can be obtained through the Yosemite National Park website. Little Yosemite Valley Campground is popular with Half Dome backpackers.
Campgrounds
Yosemite has numerous campgrounds, but they often fill up quickly, so make reservations well in advance. Campgrounds near Yosemite Valley are the most popular and convenient for Half Dome hikers.
Hiking Alternatives for Various Skill Levels
Yosemite offers an array of hiking trails suitable for hikers of all levels, from beginner to advanced. If Half Dome is beyond your current abilities or you prefer a different experience, consider exploring:
- Sentinel Dome Trail
- Taft Point Trail
- Four-Mile Trail
- Cathedral Lakes Trail
Community and Online Resources
Joining hiking forums, online communities, or social media groups dedicated to Yosemite and Half Dome can be invaluable for exchanging tips, sharing experiences, and staying updated on trail conditions. Websites and mobile apps such as AllTrails, REI’s Hiking Project, and the official Yosemite National Park website are great resources for trail maps, weather updates, and conditions.
Conclusion
Hiking Half Dome in Yosemite National Park is a once-in-a-lifetime experience that tests your physical and mental limits while rewarding you with breathtaking views and a deep connection to nature. Whether you’re a seasoned hiker or someone new to the world of outdoor adventure, the journey to Half Dome is an achievement to be celebrated.
As you embark on this awe-inspiring hike, remember that the natural beauty of Yosemite is preserved through responsible and respectful actions. Following safety guidelines, leaving no trace, and appreciating the land are essential steps to ensure the preservation of Half Dome for future generations.
If you enjoy hiking, you might also like my guides to hiking in other parts of Yosemite, Banff, Sedona, and Punta Mita.


Very helpful info about the permit system, thank you! Lucky that you managed to snag one for your anniversary 🙂
Congrats. I have hiked to Vernal and Nevada falls and those were hard. I can imagine continuing on is quite the thrill.
The hike sounds amazing. I didn’t know you need a permit to hike. Thanks for the information.
This hike looks like one for the books and I’ve GOT to do it. Thank you!
Amazing that you completed a strenuous hike with amazing waterfall views. I should use my “America the Beautiful” National Parks pass to visit Yosemite and leverage your reservation tips.
Half Dome looks impressive even in photos! Absolutely worth the effort you spent on the hike. I hope one day with your guide I will be able to repeat your experience and climb Half Dome! Thanks for the inspiration and useful tips!
Thanks! I hope you give it a try.
Wow! I am impressed! The views look 100% worth the physical effort it takes to complete this climb. It’s definitely something to train for.
Fantastic detailed guide! I had no idea it required so much preparation and research!
Yeah, for most people, it takes some planning to stay safe on the trail. My next post is going to be about how to pack your pack for a Half Dome hike.
Amaaaaazing! What a fabulous way to celebrate your wedding anniversary! You must have been sooo happy (if tired) at the top. I wasn’t sure if I’d fancy this hike just because there are sooo many people- but starting at ridiculous o’clock is a good way to avoid the crowds.
Great post.
Thanks! It was one for the books!